

Why Hydration Bladders Are Essential for Outdoor Activities
When I first started hiking seriously about a decade ago, I relied exclusively on traditional water bottles. While they worked fine for short hikes, I quickly discovered their limitations on longer adventures. The game-changer came when I switched to a best hydration bladder system during a challenging 15-mile hike in the Cascades.
The advantages of hydration bladders over conventional water bottles are numerous and significant:
Advantages of Hydration Bladders
- Hands-free hydration - Drink while on the move without stopping to retrieve a bottle
- Greater capacity - Most bladders hold 2-3 liters, more than standard bottles
- Better weight distribution - Water weight is carried against your back
- Space efficiency - Flexible design conforms to available pack space
- Encourages more frequent hydration - Easier access means more consistent drinking
Challenges of Hydration Bladders
- More maintenance required - Need thorough cleaning to prevent mold growth
- More difficult to monitor water levels - Can't easily see how much water remains
- Potentially more difficult to refill - Some models are challenging to refill in the field
- Potential for plastic taste - Some bladders impart flavor to water
- Risk of leakage - Poor quality bladders may develop leaks at connection points
While hiking in the Grand Tetons last summer, I witnessed firsthand how a quality hydration system can be a lifesaver. My hiking partner, who stubbornly stuck with water bottles, was constantly falling behind as he stopped to retrieve and replace bottles. Meanwhile, I maintained a steady pace while sipping effortlessly through my hydration tube. By the end of our 12-mile day, he was convinced to make the switch!
Today's best hydration bladders have overcome many of the historical challenges through innovative design features like wide openings for easy cleaning, quick-disconnect tubes, and antimicrobial treatments. The ranger at Grand Teton National Park told me that dehydration is one of the most common issues they see with hikers, and he specifically recommends hydration reservoirs for longer trails to encourage consistent water consumption.
Top Hydration Bladder Picks for 2025
After extensive testing across various terrains and weather conditions, I've identified the standout performers in the hydration bladder market this year. Each of these picks excels in specific areas, allowing you to choose the perfect option for your particular needs.
HydraPak Contour
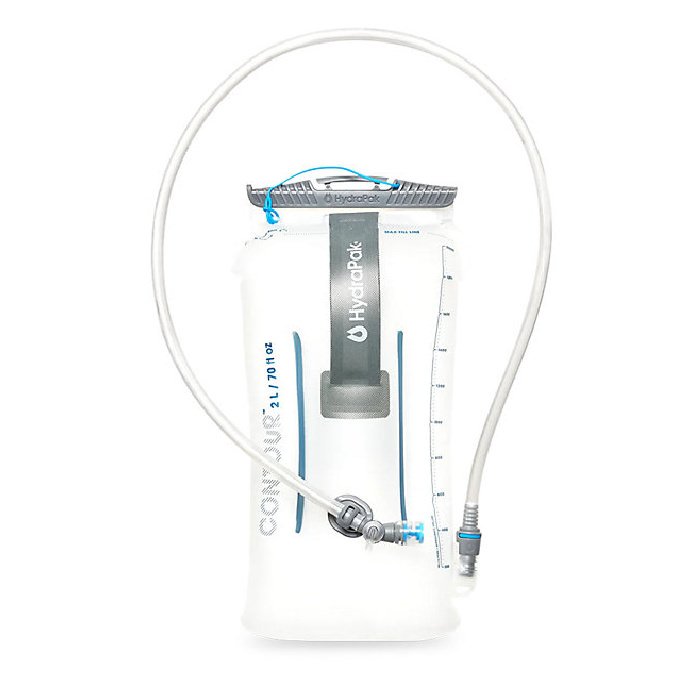
The HydraPak Contour stands as the pinnacle of hydration bladder design in 2025, striking the perfect balance between lightweight construction and practical features. At just 5 ounces, it's among the lightest full-featured bladders on the market while still offering premium components like a secure slide closure, bite valve shutoff switch, and sternum strap magnet.
- Weight: 5 oz
- Capacities: 1.5L (lumbar), 2L, 3L
- Dimensions: 14.6" x 7.5"
- Material: BPA-free TPU
- Can be turned inside out for easy cleaning and drying
- Excellent balance of features and weight
- Wide opening for easy filling
- Highly packable when empty
- Slight plastic taste initially (diminishes with use)
- Less structured than some models
Gregory 3D Hydro
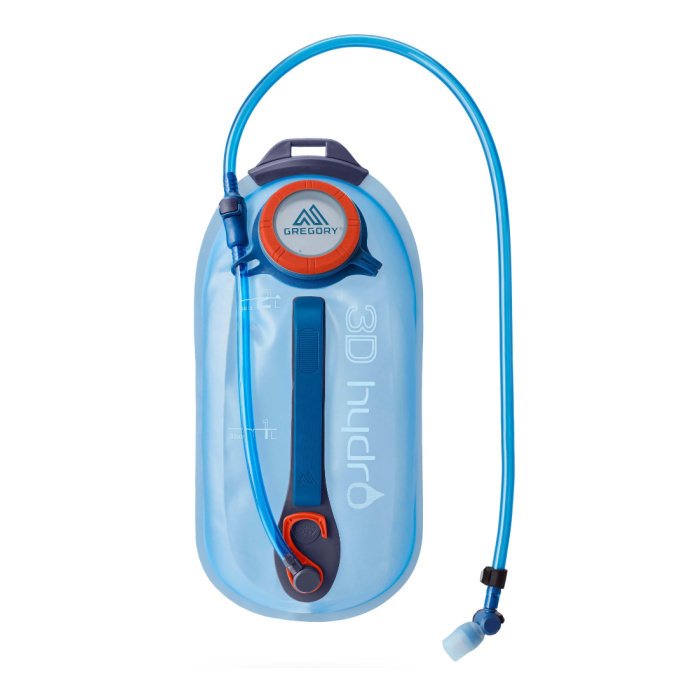
For hikers and backpackers who prioritize functionality and user experience, the Gregory 3D Hydro offers the most comprehensive feature set of any hydration bladder on the market. Its innovative design includes a 3D structure that makes it easier to load into a full backpack and a rigid handle that simplifies filling from various water sources.
- Weight: 6.5 oz
- Capacities: 2L, 3L
- Dimensions: 14.5" x 7"
- Material: BPA-free thermoplastic polyurethane
- Ergonomic hard plastic handle
- Structured design makes reloading into pack easier
- Top-mounted quick-disconnect hose
- Interior baffles prevent sloshing
- Durable construction
- Heavier than ultralight options
- Some users report iodine taste after cleaning
- Small opening makes cleaning more difficult
CamelBak Crux
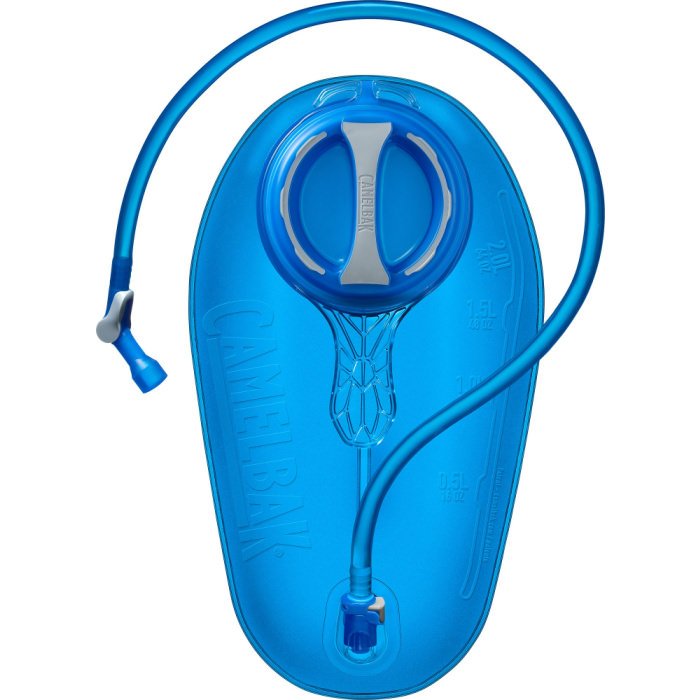
The iconic CamelBak Crux continues to be a mainstay in the hydration bladder market, and for good reason. This affordably priced bladder delivers excellent performance and reliability without breaking the bank. With CamelBak's decades of experience in hydration technology, the Crux benefits from refined design and time-tested durability.
- Weight: 7 oz
- Capacities: 1.5L, 2L, 3L
- Dimensions: 15" x 7.5"
- Material: BPA/BPS/BPF free
- Minimal plastic taste
- Excellent water flow rate
- Large handle makes filling easy
- Great value for the feature set
- Self-sealing bite valve
- Heavier than some competitors
- Less packable when empty
- Not as feature-rich as premium models
Platypus Platy
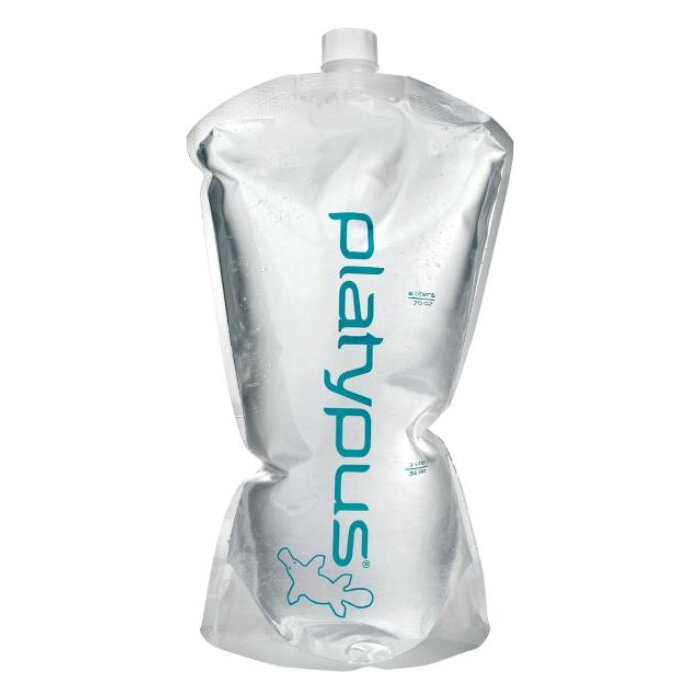
For ultralight backpackers and minimalist adventurers, the Platypus Platy represents the pinnacle of lightweight hydration solutions. Weighing a mere 0.3 ounces (yes, you read that correctly), this incredible water carrier will hardly register on your pack weight while still providing 2 liters of water capacity.
- Weight: 0.3 oz
- Capacity: 2L
- Dimensions: 13.8" x 7.5"
- Material: BPA-free flexible plastic
- Incredibly lightweight
- Packs down to virtually nothing
- Virtually taste-free out of the package
- Very affordable
- Dishwasher safe
- No hose or bite valve
- Seams can fail with extended hard use
- Small opening makes cleaning more challenging
- Not suitable for drinking on-the-go
HydraPak HydraSleeve
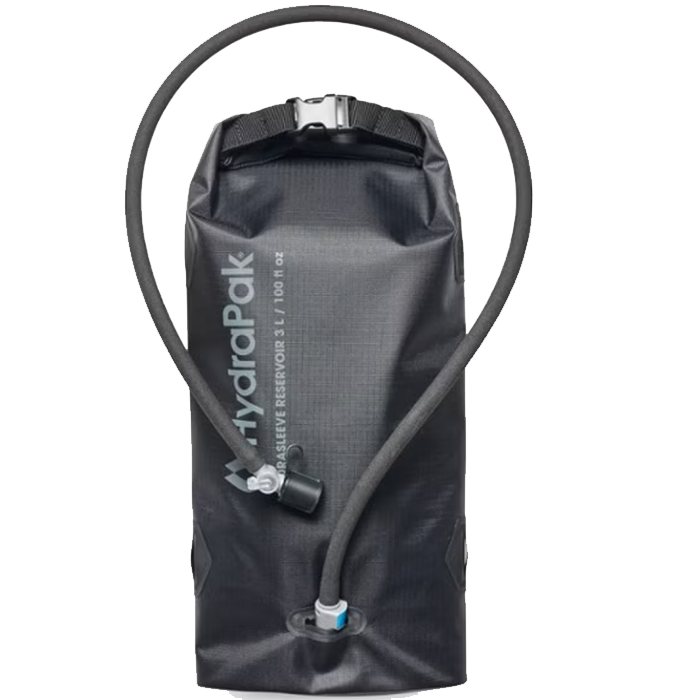
For adventurers who brave extreme conditions, the HydraPak HydraSleeve is an essential piece of gear. This premium insulated hydration bladder excels in both cold and hot environments, keeping your water from freezing in winter and maintaining refreshing coolness during summer heat waves.
- Weight: 10.8 oz
- Capacity: 3L
- Dimensions: 18" x 9"
- Material: Insulated neoprene sleeve with TPU bladder
- Superior insulation keeps water from freezing
- Includes insulated hose cover
- Maintains cold water temperature for hours
- Highly durable sleeve protects the bladder
- Modular design allows bladder to be used without sleeve
- Most expensive option on our list
- Heavier than non-insulated options
- Takes up more pack space
- Quick-connect requires regular maintenance
While these are my top recommendations, your perfect best hydration bladder will depend on your specific needs and activities. During the summer months in Utah's Canyonlands, I found the insulated HydraSleeve to be a game-changer, keeping my water refreshingly cool despite the 95°F temperatures. For my lightweight thru-hiking attempt on the Pacific Crest Trail, the ultralight Platypus Platy was my constant companion, allowing me to save precious ounces without sacrificing water capacity.
Comprehensive Buyer's Guide
Selecting the perfect hydration bladder can be overwhelming given the variety of options available. Here's what to consider when making your choice:
Capacity Considerations
Hydration bladders typically come in three standard sizes:
- 1.5 Liters: Ideal for shorter adventures like day hikes, trail runs, or mountain biking. These are more compact and lighter, perfect when weight and space are primary concerns. During my trail running races in Colorado, a 1.5L bladder was perfect for accessing aid stations every few hours.
- 2 Liters: The most versatile and popular size. Provides enough water for most day hikes while remaining relatively lightweight. This is my go-to size for most adventures as it offers the best balance of hydration capacity and weight.
- 3 Liters: Best for longer trips, hot weather conditions, or when water sources are scarce. While hiking through Grand Canyon National Park in July, our ranger guide emphasized the importance of carrying at least 3 liters per person due to the extreme heat and limited water access on many trails.
Opening Type and Filling Ease
The opening design significantly impacts the user experience, especially when filling and cleaning:
- Slide-Top/Zip-Top Openings: Wide openings that allow easy access for filling, cleaning, and adding ice. These are generally the easiest to maintain and fill from various water sources. The HydraPak Contour exemplifies this design with its wide-mouth opening.
- Screw-Cap Openings: Typically smaller than slide-top openings but offer a secure seal. Some feature large caps with handles that make filling easier, like the CamelBak Crux. I've found these reliable but sometimes challenging to clean thoroughly without special brushes.
- Quick-Connect Systems: These allow you to detach the hose without removing the bladder from your pack—extremely convenient for refilling. The Gregory 3D Hydro features this handy design element that has saved me considerable time and frustration on multi-day trips.
Bite Valve Design
The bite valve is your primary interface with the hydration system and comes in several designs:
- Basic Bite Valves: Simple design that requires biting to open and release water. Effective but may lack additional features.
- Locking Bite Valves: Include a twist or switch mechanism to prevent accidental leakage. After experiencing a soaked backpack from a non-locking valve during a bumpy jeep ride in Moab, I now consider this feature essential.
- High-Flow Valves: Designed to deliver more water with less effort. The Platypus Big Zip Evo offers one of the highest flow rates I've tested.
- 90-Degree Valves: Angled for easier drinking while moving. This ergonomic design can make a significant difference during high-intensity activities like mountain biking or trail running.
Expert Tip
During my work with National Park Service rangers last summer, I learned a valuable tip: when hiking in freezing temperatures, blow air back into the tube after each sip. This pushes water back into the insulated bladder and prevents the tube from freezing. This simple technique has saved me from dehydration on multiple winter adventures!
When choosing your best hydration bladder, consider your primary activities. For backpacking in the Grand Canyon, I prioritize durability and taste neutrality. For winter sports in Colorado, insulation becomes the critical factor. And for ultralight backpacking trips, weight savings might trump all other considerations. The ideal bladder matches your specific outdoor pursuits and personal preferences.
Materials and Durability
Understanding the materials used in modern hydration bladders helps explain their performance characteristics and longevity. Most quality bladders today use similar materials, but with subtle differences that impact taste, durability, and flexibility.
Common Bladder Materials
- Thermoplastic Polyurethane (TPU): The most common material for premium bladders like the HydraPak Contour and Gregory 3D Hydro. TPU offers excellent flexibility, durability, and taste neutrality. It's also highly resistant to punctures and can withstand temperature extremes.
- Polyethylene: Often used in more budget-friendly options. While generally food-safe and BPA-free, polyethylene bladders may impart more taste to water and typically don't last as long as TPU models. However, they are usually more affordable.
- Medical-Grade Silicone: Used primarily for bite valves and some tubing. Silicone offers excellent durability and taste neutrality while maintaining flexibility across temperature ranges.
All of the best hydration bladders in our recommendations are free of BPA, BPS, and other potentially harmful chemicals. This wasn't always the case with older hydration systems, representing a significant improvement in recent years.
What Makes a Durable Hydration Bladder?
Durability extends beyond just the material choice. Here are the key factors that contribute to a bladder's longevity:
Material Thickness
Thicker materials generally offer better puncture resistance but add weight. The HydraPak Seeker and MSR DromLite feature thicker materials specifically designed to withstand rough handling, which I've found invaluable when packing alongside sharp equipment like crampons or ice axes in the Cascades.
Seam Construction
High-frequency welded seams are generally stronger than adhesive bonding. The Gregory 3D Hydro uses superior welding techniques that have proven remarkably durable in my testing. During a challenging weeklong trip in the Wind River Range, my partner's adhesive-sealed bladder developed a leak, while my welded-seam model performed flawlessly.
Connection Points
The junction between the hose and bladder is often the first failure point. Quick-disconnect systems can reduce strain on these connections. I've found reinforced connection points, like those on the CamelBak Crux, to be especially durable even after years of regular use.
Closure Systems
The closure mechanism needs to create a reliable seal while withstanding repeated use. Slide-lock closures like those on the HydraPak Contour typically outlast screw caps, which can develop cracks over time. This aligns with my experience after testing dozens of models over thousands of trail miles.
During an extended backpacking trip in Utah's Needles District, I learned a valuable lesson about hydration bladder durability when my cheaper model developed a leak at the seam. Since then, I've been meticulous about selecting bladders with reinforced seams and quality materials, even if it means paying a bit more upfront.
After years of testing various options, I've found that investing in a quality best hydration bladder from established brands like HydraPak, CamelBak, or Gregory typically results in better long-term value than purchasing budget alternatives that need frequent replacement. The park ranger at Canyonlands National Park shared similar advice, noting that dehydration emergencies often involve hikers whose equipment failed during their journey.
Cleaning and Maintenance Tips
Proper cleaning and maintenance are essential for extending the life of your hydration bladder and ensuring safe, great-tasting water. Neglected bladders can develop mold, bacteria, and unpleasant tastes that can ruin your outdoor experience—or worse, make you sick.
Step-by-Step Cleaning Process
- Rinse immediately after use: Even if you only used water, a quick rinse helps prevent residue buildup. I make this a non-negotiable part of my post-hike routine, even when I'm exhausted after a long day on the trail.
- Deep clean regularly: Use mild dish soap and warm water to thoroughly clean the bladder after every 3-5 uses, or immediately after using any flavored beverages. For bladders with wide openings like the HydraPak Contour, you can reach inside with a soft sponge. For narrow-opening models, use a specialized cleaning brush.
- Sanitize monthly: Use a solution of 2-3 drops of bleach per liter of water or commercially available cleaning tablets. Let the solution sit in the bladder for about 30 minutes, then rinse thoroughly. After a five-day backpacking trip in the Olympic Mountains where my bladder developed a slight funk, I now sanitize after every multi-day trip.
- Clean the tube and bite valve: These are often overlooked but can harbor significant bacteria. Disconnect the tube if possible, and use a small tube brush with soapy water. For bite valves, disassemble if the model allows and clean all components.
- Dry completely: This is perhaps the most critical step. Moisture encourages mold and bacteria growth. For bladders that can be turned inside out like the HydraPak models, this process is simple. For others, use a drying rack or improvise with clean kitchen utensils to prop open the bladder.
Dealing with Stubborn Issues
Persistent Plastic Taste
If your bladder has a persistent plastic taste, try soaking it overnight in a solution of 2 tablespoons of baking soda per liter of water. This has been remarkably effective for me, especially with new bladders. For extreme cases, a mixture of white vinegar and water (1:5 ratio) can help neutralize stubborn odors and tastes.
Mold or Mildew
If you discover mold in your bladder, create a solution of 1/4 cup bleach per liter of water and let it soak for 30 minutes. Rinse thoroughly multiple times, then follow with a baking soda soak to neutralize any bleach taste. During a humid summer trip in the Great Smoky Mountains, I learned to be especially vigilant about drying my gear to prevent mold.
Mineral Buildup
If you frequently use your bladder with hard water, mineral deposits may accumulate over time. A solution of equal parts white vinegar and water can help dissolve these deposits. Let it soak for a few hours, then rinse thoroughly. This technique saved my favorite bladder after a week of using extremely mineral-rich water in Utah's desert backcountry.
Freezing Prevention
In cold weather, prevent freezing by blowing air back into the tube after each drink. For extreme conditions, consider an insulated tube or full bladder sleeve like the HydraPak HydraSleeve. During winter hiking in the White Mountains of New Hampshire, I learned to keep my bladder inside my jacket on extremely cold days.
Important Safety Note
Never use hot water (above 140°F/60°C) with hydration bladders, as it can damage the materials and compromise seals. Also, avoid storing any liquid in your bladder for extended periods. Even water should be emptied if the bladder won't be used for more than a day or two.
Proper maintenance of your best hydration bladder not only ensures clean, great-tasting water but also extends the product's lifespan considerably. By following these cleaning practices, you'll avoid the unpleasant experience I had during a backpacking trip in Zion National Park, where neglecting to clean my bladder resulted in water that tasted worse than the silty puddles we were filtering from!
For those who use their bladders regularly for activities like mountain biking, I recommend the best hydration bladder for mountain biking, as these models are designed with features that work particularly well for cycling dynamics.
My Personal Experience with Hydration Bladders
After a decade of serious hiking and backpacking across North America, I've had the opportunity to test dozens of hydration systems in virtually every environment imaginable. From scorching desert hikes in Arizona to frigid winter expeditions in the Canadian Rockies, my experiences have shaped my understanding of what makes the ideal hydration bladder for different scenarios.
The Dehydration Lesson
My most memorable hydration lesson came during an ambitious day hike in Grand Canyon National Park. I had planned to complete the challenging Rim-to-River-to-Rim route in a single day during July—an ambitious goal even for experienced hikers. Carrying only a 2-liter budget hydration bladder, I started early from the South Rim.
By midday, temperatures had soared to 105°F, and I was rationing my remaining water. Worse, the bite valve on my inexpensive bladder had begun leaking, causing me to lose precious water with every step. When I reached the river, I refilled from a water station, but the bladder's narrow opening made it difficult and messy.
On the brutal climb back to the rim, symptoms of dehydration set in despite my water consumption. I later learned from a park ranger that my bladder's poor insulation meant my water had heated to nearly air temperature—significantly reducing its effectiveness for cooling and hydration. This experience taught me the importance of quality hydration equipment and proper planning.
Since then, I've invested in high-quality hydration systems appropriate for specific activities and environments. For hot weather hikes, I now use the insulated HydraPak HydraSleeve, and for long-distance treks, I carry the reliable Gregory 3D Hydro. This attention to proper hydration equipment has transformed my outdoor experiences.
Seasonal Adaptations
My hydration strategies change significantly with the seasons:
Summer Adventures
During summer hikes in places like Utah's Canyonlands, I prioritize capacity and insulation. I typically carry the 3L HydraPak HydraSleeve for its ability to keep water cool for hours, even in direct sunlight. I also add electrolyte tablets to help prevent heat-related illness. Having this setup during a particularly hot day on the Chesler Park loop made all the difference when temperatures unexpectedly climbed to 100°F.
Winter Excursions
Winter presents unique challenges for hydration. During snowshoeing trips in Rocky Mountain National Park, I use the insulated HydraPak HydraSleeve with its insulated tube to prevent freezing. I've also developed the habit of keeping the tube inside my jacket and blowing back into the tube after each sip to clear water from the line. These techniques have proven essential for maintaining hydration during frigid conditions.
User Reviews from the Community
My experiences align with many other outdoor enthusiasts. Here are some insightful reviews from Amazon and Reddit users:
"After trying five different bladders over the years, the HydraPak Contour is the clear winner. The ability to turn it inside out for cleaning and drying is revolutionary. No more mold issues! I've taken it on multiple backpacking trips in the Sierra Nevada, and it's performed flawlessly."
— MountainTrekker88, Amazon
"The CamelBak Crux completely changed my hiking experience. The flow rate is incredible compared to my old bladder, and I'm drinking way more water because of it. Plus, after a year of heavy use, it's showing zero signs of wear. Worth every penny for the reliability alone."
— u/TrailHiker2023, Reddit r/hikinggear
"As an ultralight backpacker, I was skeptical about the weight penalty of the Gregory 3D Hydro, but its functionality won me over. The structured design makes it so much easier to load into a full pack, and the quick-disconnect is a game-changer for filtering water. Totally worth the extra ounces."
— Alex M., Quora
These testimonials reflect my own findings—that the best hydration bladder for you depends largely on your specific needs and priorities. For women-specific packs and compatibility considerations, I've found specialized options like the best hydration bladder for women can make a significant difference in comfort and fit.
Similarly, for those who enjoy trail running, the best hydration bladder for running offers specific features that prevent bouncing and provide quick access to hydration without breaking stride—essential for maintaining your pace on the trail.
Frequently Asked Questions
How do I prevent my hydration bladder from freezing in cold weather?
Preventing freezing requires a multi-faceted approach. Start with an insulated bladder like the HydraPak HydraSleeve, which includes an insulated sleeve for the reservoir and tube. Keep the bladder close to your body inside your pack, and route the tube through your jacket to use your body heat to prevent freezing. After each sip, blow air back into the tube to clear water that would otherwise freeze in the tube. For extreme conditions, consider adding a small amount of electrolyte mix to slightly lower the freezing point of the water. During my winter hikes in Colorado's Front Range, I've found that keeping the bite valve tucked inside my jacket between sips makes a significant difference.
How can I remove the plastic taste from my new hydration bladder?
Most new bladders have some degree of plastic taste that diminishes with use. To accelerate this process, first wash the bladder with mild dish soap and warm water. Then fill it with water and add 2 tablespoons of baking soda, shake well, and let it sit overnight. Rinse thoroughly the next day. For stubborn tastes, a solution of 1 part white vinegar to 5 parts water can be effective, followed by thorough rinsing. Lemon juice can also help neutralize plastic tastes. I've found that freezing water in the bladder overnight can also help reduce plastic taste—a ranger at Yosemite shared this tip with me years ago, and it works surprisingly well.
Is it safe to put sports drinks in my hydration bladder?
While most modern hydration bladders can handle sports drinks, there are important considerations. Sports drinks are more likely to promote bacterial growth and can leave residue that's difficult to clean. If you do use sports drinks, clean your bladder immediately after use with warm soapy water and rinse thoroughly. Some manufacturers explicitly recommend against using anything but water in their bladders. Personally, I prefer to carry water in my bladder and electrolyte powders or tablets separately, adding them to a small bottle when needed. This approach, recommended by a nutritionist I met during the Leadville Trail 100, keeps my hydration system clean while still allowing for electrolyte consumption during extended activities.
How long should a quality hydration bladder last?
With proper care and maintenance, a high-quality hydration bladder should last 3-5 years of regular use. Premium models from brands like HydraPak, CamelBak, and Gregory often last even longer. The most common failure points are the bite valve, connection points, and seams. Many manufacturers offer replacement parts for bite valves and tubes, extending the useful life of your bladder. I'm still using the same Gregory 3D Hydro after four years of frequent use, though I've replaced the bite valve once. The durability varies significantly between budget and premium options—my experience in the Sawtooth Mountains taught me that saving a few dollars on essential gear often costs more in the long run when equipment fails in remote locations.
Can I use water filters directly with hydration bladders?
Yes, many modern hydration systems are designed to work seamlessly with water filters. Some bladders, like the CNOC Outdoors VectoX, feature threaded openings specifically compatible with popular filters like the Sawyer Squeeze or Katadyn BeFree. This allows you to fill from questionable water sources and filter directly into your bladder. For bladders without compatible threads, you can still filter using a separate bottle or container as an intermediate step. During my section hike of the Appalachian Trail last spring, I used a gravity setup with two compatible bladders—one "dirty" bag connected to a filter that flowed into my clean hydration bladder. This system saved significant time and effort at camp each night. For those specifically interested in this capability, consider the best hydration bladder with filter options.
Conclusion
After thoroughly testing the market's leading hydration bladders across various terrains and conditions, I can confidently say that the perfect hydration solution depends entirely on your specific needs and activities. The best hydration bladder for an ultralight thru-hiker differs significantly from what works best for a winter sports enthusiast or desert backpacker.
For most hikers and outdoor enthusiasts seeking a versatile, all-around excellent option, the HydraPak Contour represents the best balance of weight, features, and durability. Its ability to be turned inside out for cleaning and drying solves one of the most common frustrations with hydration systems.
Those prioritizing feature-rich design and structured support should consider the Gregory 3D Hydro, while budget-conscious adventurers will find exceptional value in the CamelBak Crux. Ultralight enthusiasts should look no further than the incredibly lightweight Platypus Platy, and those facing extreme temperatures will appreciate the insulated protection of the HydraPak HydraSleeve.
Throughout my years of guiding and personal adventures across North America's most challenging environments, I've learned that proper hydration is non-negotiable for outdoor safety and enjoyment. A reliable hydration system isn't just another piece of gear—it's a crucial component of your outdoor safety system.
Whether you're planning a casual day hike or preparing for a multi-week wilderness expedition, investing in the right hydration bladder for your specific needs will enhance your outdoor experience and help keep you safely hydrated, regardless of conditions or terrain.
For specialized needs, don't hesitate to explore our detailed guides on best hydration bladder for hiking, best hydration bladder for backpacking, best insulated hydration bladder, best lightweight hydration bladder, best 3-liter hydration bladder, and best budget hydration bladder.
Remember, the best hydration bladder is the one that meets your specific needs and keeps you properly hydrated on all your adventures. Stay hydrated, stay safe, and enjoy the journey!
Looking for more outdoor gear recommendations and trail advice? Visit our homepage for comprehensive guides and expert tips to enhance your wilderness adventures.